This step will probably require support from your IT department.
I. Create new server instance (optional)
Since you are changing the settings of your Business Central or NAV server instance, you may be required to restart the service several times during this process. It is therefore recommended, but not mandatory, to have a separate server instance. This way, no users who may already be logged in in the local environment will not be affected by this process.
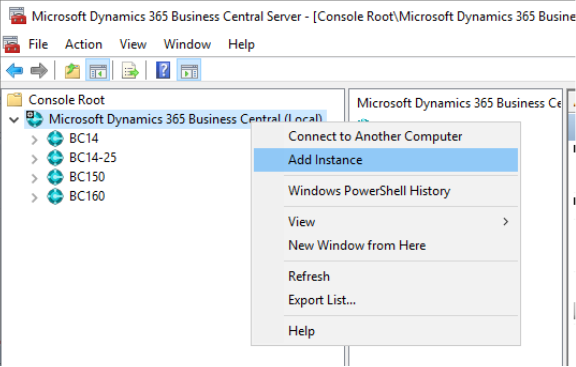
1.Open your “Business Central Server Administration Tool”, right-click on the Business Central node and select “Add Instance”.

Figure 1
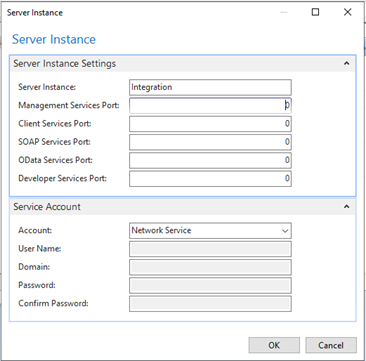
2.Fill in the window with the server instance information. Please note that all “Port” fields are required. Note the Odata Services port, and then click “OK”.

Figure 2
II. Service for SSL configuration
1.Cloud Connector requires secure connections over HTTPS. To do this, a signed SSL certificate must be purchased and installed on the machine hosting the Business Central server instance. Pay special attention to the certificate thumbprint, as it is required to configure the Business Central server instance. The process of acquiring and installing this certificate is beyond the scope of this document. For more information, see this Microsoft article.
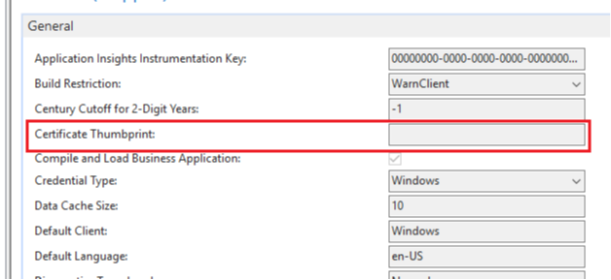
2.The certificate thumbprint allows you to return to the Business Central Administration console. In the left bar, select the server instance to be used with Cloud Connector and click “Edit”. Under the “General” section, fill in the “Certificate thumbprint” field and click “Save”.

Figure 3
III. Configure Windows authentication
There are two relevant settings in the Business Central Administration console to enable Windows authentication for Cloud Connector. The first is credential type. It should already be set to “Windows”. The second required setting is “Use NTLM authentication”. Authentication will not work if this setting is not enabled.

Figure 4

Figure 5
IV. OData – Enable connection
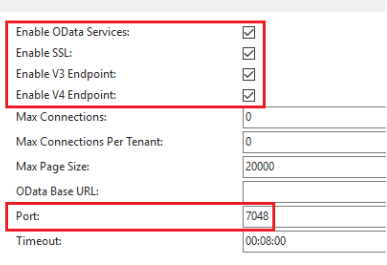
1.You now need to configure OData properties in the Business Central Administration console. After you select the correct Business Central server instance in the left bar, scroll down to the OData Services section in the Properties pane. Make sure that the settings below are enabled:
•OData – Enable services
•Enable SSL
•V4 – Enable endpoint

Figure 6
2. Note the port number. It is the port that must be enabled for incoming network connections.